Entegrasyon Testini Keşfetmek: Temel Kavramlar ve Uygulamalar
Entegrasyon testi, yazılım projelerimizi test etmek için kullandığımız yöntemlerinden biridir. Entegrasyon testi ile projemizdeki modüllerin ve bileşenlerin arasındaki etkileşimleri aynı zamanda veri akışını test edebiliriz. Testlerimizde dosyaya ya da veritabanına bir veri yazabilir, okuyabilir ve 3.parti servislere istek atabiliriz. Yani, birim testlerimiz infrastructure katmanından izole durumundayken entegrasyon testlerimiz infrastructure katmanı ile birlikte çalışır. Entegrasyon testlerini yazmak maliyetlidir. Birim testlere göre zahmetli ve çalışma süreleri daha uzundur. Entegrasyon testlerin sayısı artıkça testlerin tamamlanma süresi artacaktır. Her entegrasyon testi için infrastructure katmanını ayağa kaldırmak gerekecektir. Her test senaryosu için verilerin ilgili test senaryosuna göre hazırlanması gerekecektir. Entegrasyon testlerin bu tip dezavantajları sebebiyle sadece happy path testlerimizi yazmak daha doğru olacaktır. Diğer test senaryolarımız için birim testleri kullanarak test süresini olabilecek en kısa süreye çekebilir ve sadece iş akışına odaklanan testler yazabiliriz.
Happy Path Test: Hata ve istisna içermeyen, girdilerin ve çıktıların beklendiği gibi olan test senaryosudur.
Entegrasyon testinden kısaca bahsettiğimize göre basit bir örnek yaparak aspnetcore ile geliştirdiğimiz projelerde nasıl entegrasyon testi yazabiliriz bakalım. Entegrasyon testlerinde ihtiyacımız olan infrastructure katmanlarını her test senaryosunda sıfırdan oluşturmak için testcontainers kullanabiliriz. Testcontainers, Docker kullanarak test senaryosunda ihtiyacımız olan postgres, rabbitmq, redis gibi sistemleri ya da teknolojileri çalıştıran ve test senaryosu tamamlandığında kaynağı ortadan kaldıran bir açık kaynak bir yazılımdır.
Testcontainer için daha fazla bilgiye erişmek istiyorsanız, https://testcontainers.com/ adresini ziyaret edebilirsiniz.
Bizim örneğimizde bir webapi projemiz olacak ve bu projemiz ürün modülünü yönetecek. Basit bir şekilde sisteme ürün ekleyebilecek, ürün silebilecek, ürün güncelleyebilecek ve sistemdeki ürünleri geri dönebilecek. Her servis için happy path test senaryosunu uygulayacağız.
POST /api/products
PUT /api/products
DELETE /api/products
GET /api/products
GET /api/products/{uuid}
Projemizi Oluşturalım.
İlk önce aspnetcore 8.0 projemizi oluşturalım. Boş bir solution oluşturmak için aşağıya terminal kodunu yazıyorum.
dotnet new sln -o IntegrationTestAspNetCoreExample -n IntegrationTestAspNetCoreExample
Ardından domain, application, infrastructure ve http api katmanlarını oluşturuyorum ve bunları solution'a ekliyorum.
dotnet new classlib -o Domain -n Domain
dotnet new classlib -o Application -n Application
dotnet new classlib -o Infrastructure -n Infrastructure
dotnet new webapi -o HttpApi -n HttpApi

dotnet sln add .\Domain\Domain.csproj
dotnet sln add .\Application\Application.csproj
dotnet sln add .\Infrastructure\Infrastructure.csproj
dotnet sln add .\HttpApi\HttpApi.csproj
Projenin kurulmuş temiz halini aşağıdaki linkten erişebilirsiniz.
Domain Katmanını Yazalım.
Projemize ilk Product domain entity kodlayarak başlayalım. Ürün sınıfı içerisinde id, isim, açıklama, ürünün kapak resim linki, fiyat ve stok adedini tutuyoruz. Ürün sınıfımız aşağıdaki gibi olacaktır.
using Domain.Exceptions;
using System.Text.RegularExpressions;

namespace Domain;

public sealed class Product
{
    public Guid Id { get; private set; }
    public string Name { get; private set; } = null!;
    public string Description { get; private set; } = null!;
    public string ImageLink { get; private set; } = null!;
    public decimal Price { get; private set; }
    public int Quantity { get; private set; }

    private Product() {}

    public static Product Create(string name, string description, string imageLink, decimal price, int quantity)
    {
        var product = new Product
        {
            Id = Guid.NewGuid()
        };
        product.SetName(name);
        product.SetDescription(description);
        product.SetImageLink(imageLink);
        product.SetPrice(price);
        product.SetQuantity(quantity);
        return product;
    }

    public void SetName(string name)
    {
        if (string.IsNullOrEmpty(name))
        {
            throw new NameMinLengthException();
        }

        if (name.Length > 120)
        {
            throw new NameMaxLengthException();
        }

        Name = name;
    }

    public void SetDescription(string description)
    {
        if (string.IsNullOrEmpty(description))
        {
            throw new DescriptionMinLengthException();
        }

        if (description.Length > 1000)
        {
            throw new DescriptionMaxLengthException();
        }

        Description = description;
    }

    public void SetImageLink(string imageLink)
    {
        var isCreatedUri = Uri.TryCreate(imageLink, UriKind.Absolute, out var imageLinkUri);
        if (!isCreatedUri || imageLinkUri == null)
        {
            throw new InvalidImageLinkException();
        }

        var availableSchemes = new List<string>
        {
                        Uri.UriSchemeHttp, Uri.UriSchemeHttps
        };

        if (availableSchemes.Contains(imageLinkUri.Scheme) == false)
        {
            throw new InvalidImageLinkException();
        }

        var isMatchExtension = Regex.IsMatch(imageLink, @"\.(jpeg|jpg|gif|png)$", RegexOptions.IgnoreCase);
        if (isMatchExtension == false)
        {
            throw new InvalidImageLinkException();
        }

        ImageLink = imageLink;
    }

    public void SetPrice(decimal price)
    {
        if (price <= 0)
        {
            throw new InvalidPriceException();
        }

        Price = price;
    }

    public void SetQuantity(int quantity)
    {
        if (quantity < 0)
        {
            throw new InvalidQuantityException();
        }

        Quantity = quantity;
    }
}
Ürünler için veritabanı sorgulamalarını yapmak Repository design patterni kullanacağız. Bunun için IProductRepository interfacesini yazıyoruz.
public interface IProductRepository
{
    Task AddAsync(Product product);
    void Update(Product product);
    void Delete(Product product);
    Task<Product> GetByIdAsync(Guid id);
    Task<List<Product>> GetListAsync();
}
Yapılan işlemler sonucunda, etkilenen nesnelerin veritabanına tek bir bağlantı altında toplu şekilde işlenmesi için Unit of Work design patterni kullanacağız. Bunun için IUnitOfWork interfacesini yazıyoruz.
Unit of Work patterni sayesinde veritabanı tarafında bir transaction oluşturup, yapılan değişiklikler veritabanına yazılmaya çalışılacak. Eğer bu işlem sırasında bir hata oluşursa veritabanında yapılan tüm değişiklikleri geri alınacak. Bu sayede veritabanında tutarlılığı (consistency) sağlamış olacağız.
public interface IUnitOfWork
{
    Task<int> SaveChangesAsync(CancellationToken cancellationToken = default);
}
Tutarlılık (Consistency): Bir dizi veritabanı işleminin tek bir birim olarak ele alınmasını ve tüm değişikliklerin bir araya getirilmesini veya geri alınmasını sağlamaya yardımcı olur. Bu, özellikle veri tutarlılığının kritik olduğu uygulamalarda önemlidir.
Yapılan geliştirmeleri bu linkten erişebilirsiniz.
Infrastructure Katmanını Kodlayalım.
Projemizin domain katmanını yazdıktan sonra infrastructure katmanını geliştirmeye başlayabiliriz. Infrastructure katmanı, Domain katmanına erişebilmesi için Domain katmanın referansını eklemeliyiz.
dotnet add .\Application\Application.csproj reference .\Domain\Domain.csproj
dotnet add .\Infrastructure\Infrastructure.csproj reference .\Application\Application.csproj
Referansları ekledikten sonra geliştirme sürecimize devam edebiliriz. Ürünlerimizi postgres veritabanı üzerinde tutacağız. Verileri okumak, yazmak için Entity Framework Core ORM kütüphanesini kullanacağız. Bunun için bazı nuget paketlerine ihtiyacımız var. Postgres veritabanı üzerinde entity framework core orm kütüphanesi ile çalışabilmek için Npsql.EntityFrameworkCore.PostgreSQL nuget paketini indirelim. Ardından veritabanı tablolarımızda, kolonlarımızda Snake-Case isimlendirme yapabilmemiz için EFCore.NamingConventions nuget paketini indirelim.
dotnet add .\Infrastructure\Infrastructure.csproj package Npgsql.EntityFrameworkCore.PostgreSQL
dotnet add .\Infrastructure\Infrastructure.csproj package EFCore.NamingConventions
Bu nuget paketler dışında Microsoft.Extensions.Configuration.Abstractions ve Microsoft.Extensions.DependencyInjection.Abstractions paketlerine ihtiyacımız olacak. Bu paketler sayesinde infrastructure katmanımızın konfigurasyonlarını yapabileceğiz.
dotnet add .\Infrastructure\Infrastructure.csproj package Microsoft.Extensions.Configuration.Abstractions
dotnet add .\Infrastructure\Infrastructure.csproj package Microsoft.Extensions.DependencyInjection.Abstractions
Gerekli nuget paketlerini indirdikten sonra ApplicationDbContext sınıfımızı yazabiliriz. Bu sınıfımızı DbContext sınıfından türeteceğiz. Ayrıca domain katmanında yazdığımız IUnitOfWork interfacesinide ApplicationDbContext sınıfına implement ediyoruz.
DbContext sınıfı, projemiz ile veritabanı arasında bir bağlantı sağlar, veritabanını yönetmemizi sağlar. Veritabanı sorgularını gerçekleştirir, okuma ve yazma işlemlerini yapar. DbContext hakkında daha fazla bilgi edinmek istiyorsan, https://learn.microsoft.com/en-us/ef/core/dbcontext-configuration/ adresini ziyaret edebilirsin.
using Domain;
using Microsoft.EntityFrameworkCore;

namespace Infrastructure;

public sealed class ApplicationDbContext(DbContextOptions options) : DbContext(options), IUnitOfWork
{
    protected override void OnModelCreating(ModelBuilder modelBuilder)
    {
        modelBuilder.ApplyConfigurationsFromAssembly(typeof(ApplicationDbContext).Assembly);
        base.OnModelCreating(modelBuilder);
    }
}
ProductRepository sınıfımı yazıyoruz ve IProductRepository interfacesini implement ediyoruz. ApplicationDbContext sınıfımızı kullanarak ürün için gerekli veritabanı işlemlerini gerçekleştiriyoruz.
using Domain;
using Microsoft.EntityFrameworkCore;

namespace Infrastructure.Repositories;

public sealed class ProductRepository(ApplicationDbContext dbContext): IProductRepository
{
    public async Task AddAsync(Product product)
    {
        await dbContext.AddAsync(product);
    }

    public void Update(Product product)
    {
        dbContext.Update(product);
    }

    public void Delete(Product product)
    {
        dbContext.Remove(product);
    }

    public async Task<Product?> GetByIdAsync(Guid id)
    {
        return await dbContext.Set<Product>().FirstOrDefaultAsync(p => p.Id == id);
    }

    public async Task<List<Product>> GetListAsync()
    {
        return await dbContext.Set<Product>().ToListAsync();
    }
}
Bu demo projemizde code first yaklaşımıyla çalışıyoruz. Product entity için veritabanında bir tablo oluşturmak için migration oluşturacağız. Bu yüzden ProductTypeConfiguration sınıfını yazalım.
using Domain;
using Microsoft.EntityFrameworkCore;
using Microsoft.EntityFrameworkCore.Metadata.Builders;

namespace Infrastructure.TypeConfigurations;

public sealed class ProductTypeConfiguration: IEntityTypeConfiguration<Product>
{
    public void Configure(EntityTypeBuilder<Product> builder)
    {
        builder.ToTable("products");

        builder.HasIndex(p => p.Id).IsUnique();
        builder.Property(p => p.Id)
                        .IsRequired();

        builder.Property(p => p.Name)
                        .HasMaxLength(120)
                        .IsRequired();

        builder.Property(p => p.Description)
                        .HasMaxLength(1000)
                        .IsRequired();

        builder.Property(p => p.ImageLink)
                        .HasMaxLength(255)
                        .IsRequired();

        builder.Property(p => p.Price)
                        .IsRequired();

        builder.Property(p => p.Quantity)
                        .IsRequired();

    }
}
Infrastructure katmanında yapacağımız son işlem ise bağımlıkları tanımlamak olacak. Bu yüzden DependencyInjection sınıfımızı oluşturalım ve aşağıdaki gibi dolduralım.
using Domain;
using Infrastructure.Repositories;
using Microsoft.EntityFrameworkCore;
using Microsoft.Extensions.Configuration;
using Microsoft.Extensions.DependencyInjection;

namespace Infrastructure;

public static class DependencyInjection
{
    public static IServiceCollection AddInfrastructure(this IServiceCollection services, IConfiguration configuration)
    {
        var dbConnectionString = configuration.GetConnectionString("Database") ??
                                 throw new ArgumentNullException(nameof(configuration));
        services.AddDbContext<ApplicationDbContext>(builder =>
        {
            builder.UseNpgsql(dbConnectionString).UseSnakeCaseNamingConvention();
        });

        services.AddScoped<IProductRepository, ProductRepository>();
        services.AddScoped<IUnitOfWork>(sp => sp.GetRequiredService<ApplicationDbContext>());

        return services;
    }
}
Yapılan geliştirmeleri bu linkten erişebilirsiniz.
Application Katmanını Kodlayalım.
Infrastructure katmanını da hazırladık. Şimdi application katmanını yazalım. Ürün ekleme, güncelleme, silme, ürünleri getirme servisleri bu katmanda bulunacak. Servislerimizi yazmadan önce ihtiyacımız olan nuget paketi olan Microsoft.Extensions.DependencyInjection.Abstractions paketini indirelim. Bu paket ile servislerimizi dependency injection altyapısına kaydedeceğiz.
dotnet add .\Application\Application.csproj package Microsoft.Extensions.DependencyInjection.Abstractions
Dependency Injection hakkında daha fazla bilgiye bu adresten ulaşabilirsiniz.
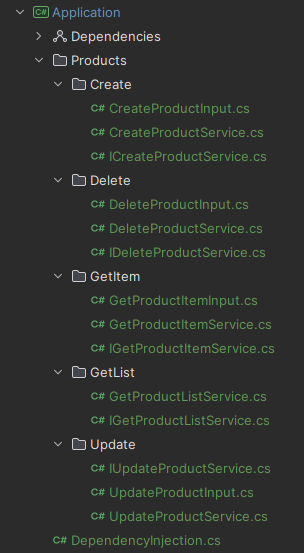
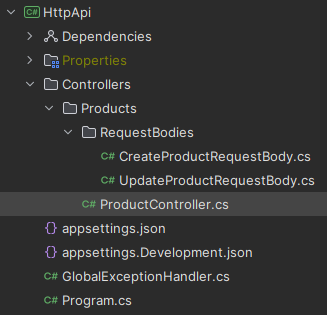
Benim uygulama katmanındaki proje yapım yukarıdaki görseldeki gibidir. Dilerseniz bu şekilde sizde klasörleme yapabilirsiniz. Sizin tüm kod parçalarını kolaylıkla alabilmeniz için kod örneklerinde hepsini beraber koyacağım.
Servislere ürün ya da ürünleri getiren servisler ile başlıyoruz. İlk servisimiz GetProductItemService servisidir. Bu servis verilen id değerine göre ürünü getirmeye çalışıyor. Eğer ürün bulunmazsa bir hata fırlatıyoruz.
using Domain;

namespace Application.Products.GetItem;

public sealed record GetProductItemInput
{
    public required Guid Id { get; set; }
}

public interface  IGetProductItemService
{
    Task<Product> Handle(GetProductItemInput input);
}

internal sealed class GetProductItemService(
    IProductRepository productRepository
    ): IGetProductItemService
{
    public async Task<Product> Handle(GetProductItemInput input)
    {
        var id = input.Id;
        return await productRepository.GetByIdAsync(id)
               ?? throw new NullReferenceException(nameof(Product));
    }
}
İkinci servisimiz GetProductListService servisidir. Bu servis veritabanındaki tüm ürünleri getirmeye çalışıyor.
using Domain;

namespace Application.Products.GetList;

public interface  IGetProductListService
{
    Task<List<Product>> Handle();
}

internal sealed class GetProductListService(
    IProductRepository productRepository
    ): IGetProductListService
{
    public async Task<List<Product>> Handle()
    {
        return await productRepository.GetListAsync();
    }
}
Üçüncü servisimiz CreateProductService servisidir. Bu servis ile veritabanımıza bir ürün ekleyeceğiz.
using Domain;

namespace Application.Products.Create;

public sealed record CreateProductInput
{
    public required string Name { get; set; } = null!;
    public required string Description { get; set; } = null!;
    public required string ImageLink { get; set; } = null!;
    public required decimal Price { get; set; }
    public required int Quantity { get; set; }
}

public interface ICreateProductService
{
    Task<Guid> Handle(CreateProductInput input);
}

internal sealed class CreateProductService(
    IUnitOfWork unitOfWork,
    IProductRepository productRepository
    ): ICreateProductService
{
    public async Task<Guid> Handle(CreateProductInput input)
    {
        var name = input.Name;
        var description = input.Description;
        var imageLink = input.ImageLink;
        var price = input.Price;
        var quantity = input.Quantity;

        var product = Product.Create(name, description, imageLink, price, quantity);
        await productRepository.AddAsync(product);
        await unitOfWork.SaveChangesAsync();

        return product.Id;
    }
}
Dördüncü servisimiz UpdateProductService servisidir. Bu servis ile verilen id değerindeki ürünü buluyoruz ve onun değerlerini güncelliyoruz. Eğer verilen id'ye göre bir ürün bulunamazsa hata veriyoruz.
using Domain;

namespace Application.Products.Update;

public sealed record UpdateProductInput
{
    public required Guid Id { get; set; }
    public required string Name { get; set; } = null!;
    public required string Description { get; set; } = null!;
    public required string ImageLink { get; set; } = null!;
    public required decimal Price { get; set; }
    public required int Quantity { get; set; }
}

public interface  IUpdateProductService
{
    Task<Product> Handle(UpdateProductInput input);
}

internal sealed class UpdateProductService(
    IUnitOfWork unitOfWork,
    IProductRepository productRepository
    ): IUpdateProductService
{
    public async Task<Product> Handle(UpdateProductInput input)
    {
        var id = input.Id;
        var name = input.Name;
        var description = input.Description;
        var imageLink = input.ImageLink;
        var price = input.Price;
        var quantity = input.Quantity;

        var product = await productRepository.GetByIdAsync(id)
                      ?? throw new NullReferenceException(nameof(Product));

        product.SetName(name);
        product.SetDescription(description);
        product.SetImageLink(imageLink);
        product.SetPrice(price);
        product.SetQuantity(quantity);

        productRepository.Update(product);
        await unitOfWork.SaveChangesAsync();

        return product;
    }
}
Beşinci ve son servisimiz DeleteProductService servisidir. Bu servis ile verilen id değerindeki ürünü buluyoruz ve onu siliyoruz. Eğer verilen id'ye göre bir ürün bulunamazsa hata veriyoruz.
using Domain;

namespace Application.Products.Delete;

public sealed record DeleteProductInput
{
    public required Guid Id { get; set; }
}

public interface IDeleteProductService
{
    Task Handle(DeleteProductInput input);
}

internal sealed class DeleteProductService(
    IUnitOfWork unitOfWork,
    IProductRepository productRepository
    ): IDeleteProductService
{
    public async Task Handle(DeleteProductInput input)
    {
        var id = input.Id;

        var product = await productRepository.GetByIdAsync(id)
               ?? throw new NullReferenceException(nameof(Product));

        productRepository.Delete(product);
        await unitOfWork.SaveChangesAsync();
    }
}
Servislerimizi yazdık. Bu servisleri di altyapısına kaydetmek için gerekli konfigürasyonu DependencyInjection sınıfında yapıyoruz.
using Application.Products.Create;
using Application.Products.Delete;
using Application.Products.GetItem;
using Application.Products.GetList;
using Application.Products.Update;
using Microsoft.Extensions.DependencyInjection;

namespace Application;

public static class DependencyInjection
{
    public static IServiceCollection AddApplication(this IServiceCollection services)
    {
        services.AddScoped<ICreateProductService, CreateProductService>();
        services.AddScoped<IUpdateProductService, UpdateProductService>();
        services.AddScoped<IDeleteProductService, DeleteProductService>();
        services.AddScoped<IGetProductListService, GetProductListService>();
        services.AddScoped<IGetProductItemService, GetProductItemService>();

        return services;
    }
}
Application katmanını geliştirme sürecini tamamladık. Son olarak HttpApi katmanını kodlayalım ve entegrasyon testini yazma sürecine girelim.
Yapılan geliştirmeleri bu linkten erişebilirsiniz.
HttpApi Katmanını Kodlayalım.
HttpApi katmanı bir sunum (presentation) katmanıdır. Bu katman ile gelen istekleri karşılayıp ilgili uygulama katmanındaki servislere yönlendireceğiz ve gelen cevapları istemciye geri döneceğiz. Ayrıca bu katman sayesinde merkezi hata yakalama altyapısı kurarak, sistemde oluşan hataları yakalayıp, işleyebileceğiz. Son olarak bu katmanda veritabanımızı, tablolarımızı oluşturmak için bir migration versiyonu oluşturacağız ve onu veritabanına aktaracağız.
İlk önce HttpApi katmanı, Infrastructure katmanına erişebilmesi için ilgili referansı ekliyoruz.
dotnet add .\HttpApi\HttpApi.csproj reference .\Infrastructure\Infrastructure.csproj
Daha sonra veritabanı bağlantısı bilgisini appsettings.Development.json dosyası içerisine ekliyoruz.
{
  "Logging": {
    "LogLevel": {
      "Default": "Information",
      "Microsoft.AspNetCore": "Warning"
    }
  },
  "ConnectionStrings": {
    "Database": "Host=localhost;Port=5432;Database=Demo;Username=postgres;Password=password"
  },
  "AllowedHosts": "*"
}
Program.cs her aspnetcore projesinde gördüğümüz c# dosyasıdır. Bu dosyada bir WebApplication ayağa kaldırmak için gerekli kurulumları, konfigürasyonları yaparız. Aşağıdaki kod parçasında Application ve Infrastructure katmanlarının AddInfrastructure ve AddApplication extension methodlarını çağırdık. Bu şekilde uygulamamız çalışmaya başladığı zaman yazmış olduğumuz kurulumlar ve konfigürasyonlar işlenmiş olacak. Merkezi olarak web uygulamamız çalışırken oluşan hataları yakalamak için GlobalExceptionHandler sınıfını geliştirdik. Ayrıca oluşturmuş olduğumuz migration dosyasının postgres veritabanından işlenmesi için migration işlemini de yapıyoruz.
using Application;
using HttpApi;
using Infrastructure;
using Microsoft.EntityFrameworkCore;

var builder = WebApplication.CreateBuilder(args);

builder.Services.AddControllers(options => { options.SuppressAsyncSuffixInActionNames = false; });
builder.Services.AddEndpointsApiExplorer();
builder.Services.AddSwaggerGen();
builder.Services.AddInfrastructure(builder.Configuration);
builder.Services.AddApplication();
builder.Services.AddExceptionHandler<GlobalExceptionHandler>();
builder.Services.AddProblemDetails();

var app = builder.Build();

if (app.Environment.IsDevelopment())
{
    app.UseSwagger();
    app.UseSwaggerUI();
}

app.UseExceptionHandler();
app.UseHttpsRedirection();
app.MapControllers();


using (var scope = app.Services.CreateScope())
{
    var services = scope.ServiceProvider;
    var applicationDbContext = services.GetRequiredService<ApplicationDbContext>();
    applicationDbContext.Database.Migrate();
}

app.Run();

public abstract partial class Program;
using System.Text;
using System.Text.Json;
using Microsoft.AspNetCore.Diagnostics;

namespace HttpApi;

internal sealed class GlobalExceptionHandler(ILogger<GlobalExceptionHandler> logger) : IExceptionHandler
{
    public async ValueTask<bool> TryHandleAsync(
        HttpContext httpContext,
        Exception exception,
        CancellationToken cancellationToken)
    {
        logger.LogError(
            exception, "Exception occurred: {Message}", exception.Message);

        httpContext.Response.ContentType = "application/json";

        httpContext.Response.StatusCode = StatusCodes.Status400BadRequest;
        var jsonString = JsonSerializer.Serialize(new
        {
            StatusCode = StatusCodes.Status400BadRequest,
            Message = "Bir hata oluştu"
        });
        var jsonBytes = Encoding.UTF8.GetBytes(jsonString);
        await httpContext.Response.Body.WriteAsync(jsonBytes, cancellationToken);

        return true;
    }
}
Program.cs dosyası içerisinde gerekli kurulumları ve konfigürasyonları yazdıktan sonra ProductController sınıfımızı kodlayabiliriz. Bu kontroller sınıfı ile istemcilerden istekleri alacağız ve ilgili servisleri çağırarak istekleri işleyeceğiz ve servisten cevap geldiğinde istemciye geri döneceğiz.
using Application.Products.Create;
using Application.Products.Delete;
using Application.Products.GetItem;
using Application.Products.GetList;
using Application.Products.Update;
using Domain;
using HttpApi.Controllers.Products.RequestBodies;
using Microsoft.AspNetCore.Mvc;

namespace HttpApi.Controllers.Products;

[ApiController]
[Route("api/products")]
public sealed class ProductController
    (
        ICreateProductService createProductService,
        IUpdateProductService updateProductService,
        IDeleteProductService deleteProductService,
        IGetProductItemService getProductItemService,
        IGetProductListService getProductListService): ControllerBase
{
    [HttpPost]
    public async Task<ActionResult<Guid>> CreateAsync([FromBody] CreateProductRequestBody requestBody)
    {
        var result = await createProductService.Handle(new CreateProductInput
        {
            Description = requestBody.Description,
            Name = requestBody.Name,
            Price = requestBody.Price,
            Quantity = requestBody.Quantity,
            ImageLink = requestBody.ImageLink
        });
        return CreatedAtAction(nameof(GetItemAsync), new { id = result }, result);
    }

    [HttpPut(template: "{id:guid}")]
    public async Task<ActionResult<Product>> UpdateAsync(Guid id, [FromBody] UpdateProductRequestBody requestBody)
    {
        var result = await updateProductService.Handle(new UpdateProductInput
        {
            Id = id,
            Description = requestBody.Description,
            Name = requestBody.Name,
            Price = requestBody.Price,
            Quantity = requestBody.Quantity,
            ImageLink = requestBody.ImageLink
        });
        return Ok(result);
    }

    [HttpDelete(template: "{id:guid}")]
    public async Task<ActionResult> DeleteAsync(Guid id)
    {
        await deleteProductService.Handle(new DeleteProductInput
        {
            Id = id
        });
        return NoContent();
    }

    [HttpGet(template: "{id:guid}")]
    public async Task<ActionResult<Product>> GetItemAsync(Guid id)
    {
        var result = await getProductItemService.Handle(new GetProductItemInput
        {
            Id = id
        });

        return Ok(result);
    }

    [HttpGet]
    public async Task<ActionResult<List<Product>>> GetListAsync()
    {
        var result = await getProductListService.Handle();
        return Ok(result);
    }
}
namespace HttpApi.Controllers.Products.RequestBodies;

public sealed record CreateProductRequestBody
{
    public required string Name { get; set; } = null!;
    public required string Description { get; set; } = null!;
    public required string ImageLink { get; set; } = null!;
    public required decimal Price { get; set; }
    public required int Quantity { get; set; }
}
namespace HttpApi.Controllers.Products.RequestBodies;

public sealed record UpdateProductRequestBody
{
    public required string Name { get; set; } = null!;
    public required string Description { get; set; } = null!;
    public required string ImageLink { get; set; } = null!;
    public required decimal Price { get; set; }
    public required int Quantity { get; set; }
}
HttpApi katmanını geliştirme sürecini tamamladık ve beklenen an geldi. Şimdi entegrasyon testini yazma sürecine girelim.
Yapılan geliştirmeleri bu linkten erişebilirsiniz.
Entegrasyon Testlerimizi Kodlayalım.
Demo projemizi yazdıktan sonra geldik projemizi test etmeye. Bu örnekte application katmanındaki servislerimizi için testler yazacağız. Toplamda beş adet servisimiz var. Tüm bu servisler için happy path test senaryolarını yazacağız. Lafı çok uzatmadan hemen işe koyulalım. İlk önce yeni bir xunit test projesi oluşturuyoruz.
dotnet new xunit -o tests/Application.IntegrationTests -n Application.IntegrationTests
Ardından bu projemizi solution içerisine ekliyoruz.
dotnet sln add .\tests\Application.IntegrationTests\Application.IntegrationTests.csproj
Integration testlerimizi yapabilmemiz için test projesine iki adet paket yüklememiz gerekiyor. Birincisi her test senaryosu için temiz postgres veritabanını kaldırması için testcontainers ve ikincisi projemizi her test senaryosunda ayağa kaldırılması için AspNetCore Mvc Testing paketi.
dotnet add .\tests\application.IntegrationTests\Application.IntegrationTests.csproj package Testcontainers.PostgreSql
dotnet add .\tests\application.IntegrationTests\Application.IntegrationTests.csproj package Microsoft.AspNetCore.Mvc.Testing
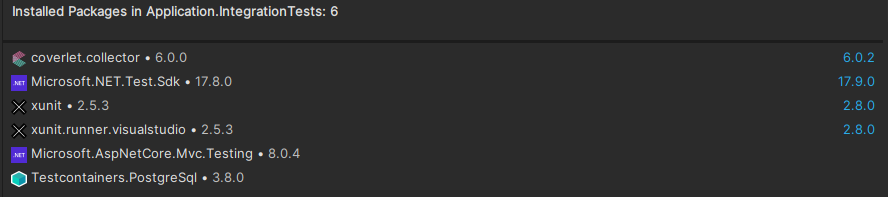
Tüm herşeyi doğru yaptıysak, paketlerimiz yukarıdaki görseldeki gibi olacaktır. Son olarakda HttpApi projemizi, test projemize referans veriyoruz.
dotnet add .\tests\Application.IntegrationTests\Application.IntegrationTests.csproj reference .\HttpApi\HttpApi.csproj
Her test senaryomuzda, yeni bir test sunucusunun ayağa kalkması için WebApplicationFactory sınıfından türeyen IntegrationTestWebAppFactory isminde bir sınıf yazıyoruz. Bu sınıf içerisinde postgres veritabanıda ayağa kaldırıyoruz. Ayrıca ConfigureWebHost methodunu override ederek, entity framework konfigürasyonunu test ortamına göre düzenliyoruz.
using Infrastructure;
using Microsoft.AspNetCore.Hosting;
using Microsoft.AspNetCore.Mvc.Testing;
using Microsoft.AspNetCore.TestHost;
using Microsoft.EntityFrameworkCore;
using Microsoft.Extensions.DependencyInjection;
using Microsoft.Extensions.DependencyInjection.Extensions;
using Testcontainers.PostgreSql;

namespace Application.IntegrationTests;

public sealed class IntegrationTestWebAppFactory: WebApplicationFactory<Program>, IAsyncLifetime
{
    private readonly PostgreSqlContainer _postgresContainer = new PostgreSqlBuilder()
        .WithImage("postgres:latest")
        .WithUsername("postgres")
        .WithPassword("postgres")
        .WithDatabase("demo")
        .Build();

    protected override void ConfigureWebHost(IWebHostBuilder builder)
    {
        builder.ConfigureTestServices(services =>
        {
            var connectionString = $"{_postgresContainer.GetConnectionString()};Pooling=False";
            services.RemoveAll(typeof(DbContextOptions<ApplicationDbContext>));
            services.AddDbContext<ApplicationDbContext>(options =>
            {
                options.UseNpgsql(connectionString,
                        op => op.UseQuerySplittingBehavior(QuerySplittingBehavior.SplitQuery))
                    .EnableSensitiveDataLogging()
                    .UseSnakeCaseNamingConvention();
            });
        });
    }

    public async Task InitializeAsync()
    {
        await _postgresContainer.StartAsync().ConfigureAwait(false);
    }

    public async Task DisposeAsync()
    {
        await _postgresContainer.DisposeAsync().ConfigureAwait(false);
    }
}
Ardından BaseIntegrationTest adında yeni sınıf oluşturuyoruz. Bu sınıfa IClassFixture interfacesini implement ediyoruz. Bu sınıf içerisinde testlerimizi gerçekleştirirken ihtiyacımız olan servisleri hazırlıyoruz.
IClassFixture,Xunit test sınıfında kullanılan bir interface'dir. Belirli bir test sınıfı için ortak kurulum ve temizleme işlemlerini yapmak için kullanılır. Testler arasında paylaşılmak üzere sınıf düzeyinde sabit bir nesnenin yaratılmasını ve yok edilmesini sağlar. Bu, testlerin daha düzenli ve yönetilmesi daha kolay hale getirirken aynı zamanda test sürelerini azaltabilir çünkü ortak nesneler her test metodu için yeniden yaratılmaz.
using Application.Products.Create;
using Application.Products.Delete;
using Application.Products.GetItem;
using Application.Products.GetList;
using Application.Products.Update;
using Infrastructure;
using Microsoft.Extensions.DependencyInjection;

namespace Application.IntegrationTests;

public abstract class BaseIntegrationTest: IClassFixture<IntegrationTestWebAppFactory>
{
    protected readonly ApplicationDbContext DbContext;
    protected readonly ICreateProductService createProductService;
    protected readonly IUpdateProductService updateProductService;
    protected readonly IDeleteProductService deleteProductService;
    protected readonly IGetProductItemService getProductItemService;
    protected readonly IGetProductListService getProductListService;

    protected BaseIntegrationTest(IntegrationTestWebAppFactory factory)
    {
        var scope = factory.Services.CreateScope();
        DbContext = scope.ServiceProvider.GetRequiredService<ApplicationDbContext>();
        createProductService = scope.ServiceProvider.GetRequiredService<ICreateProductService>();
        updateProductService = scope.ServiceProvider.GetRequiredService<IUpdateProductService>();
        deleteProductService = scope.ServiceProvider.GetRequiredService<IDeleteProductService>();
        getProductItemService = scope.ServiceProvider.GetRequiredService<IGetProductItemService>();
        getProductListService = scope.ServiceProvider.GetRequiredService<IGetProductListService>();
    }
}
IntegrationTestWebAppFactory ve BaseIntegrationTest sınıflarımızı yazdık. Artık testlerimizi yazma vakti geldi. İlk önce ürün oluşturma servisimizin testini yazalım. BaseIntegrationTest sınıfından türeyen CreateProductTests adında bir sınıf oluşturuyoruz. Gerekli input objemizi oluşturup istek atıyoruz. İstek sonucunda gelen id değerinin Guid türünde olduğunu ve Empty bir guid olmadığını kontrol ediyoruz.
using Application.Products.Create;

namespace Application.IntegrationTests.Products;

public sealed class CreateProductTests(IntegrationTestWebAppFactory factory): BaseIntegrationTest(factory)
{
    [Fact]
    public async Task Should_Create_Product()
    {
        var input = new CreateProductInput
        {
            Name = "IPhone 15 Pro",
            Description = "IPhone telefon",
            Price = 100_000,
            Quantity = 100,
            ImageLink = "https://s3.superproducts.com/iphone-15-pro.png"
        };

        var result = await createProductService.Handle(input);
        Assert.IsType<Guid>(result);
        Assert.NotEqual(Guid.Empty, result);
    }
}
İkinci yazacağımız test ürün güncelleme testi olacak. BaseIntegrationTest sınıfından türeyen UpdateProductTests adında bir sınıf oluşturuyoruz. İlk önce veritabanımıza bir ürün ekliyoruz. Daha sonra gerekli input objemizi oluşturup istek servise atıyoruz. İstek sonucunda dönen ürünün null olmadığını ve input içerisinde verilen değerler ile ürünün değerlerini karşılaştırıyoruz.
using Application.Products.Update;
using Domain;

namespace Application.IntegrationTests.Products;

public sealed class UpdateProductTests(IntegrationTestWebAppFactory factory): BaseIntegrationTest(factory)
{
    [Fact]
    public async Task Should_Update_Product()
    {
        var product = Product.Create(
            name: "IPhone 15 Pro",
            description: "IPhone telefon",
            imageLink: "https://s3.superproducts.com/iphone-15-pro.png",
            price: 100_000,
            quantity: 100);

        await DbContext.Set<Product>().AddAsync(product);
        await DbContext.SaveChangesAsync();

        var input = new UpdateProductInput
        {
            Id = product.Id,
            Name = "Updated IPhone 15 Pro",
            Description = "Updated IPhone telefon",
            Price = 125_000,
            Quantity = 80,
            ImageLink = "https://s3.superproducts.com/updated-iphone-15-pro.png"
        };

        var result = await updateProductService.Handle(input);
        Assert.NotNull(result);
        Assert.IsType<Product>(result);
        Assert.Equal(input.Id, result.Id);
        Assert.Equal(input.Name, result.Name);
        Assert.Equal(input.Description, result.Description);
        Assert.Equal(input.Price, result.Price);
        Assert.Equal(input.Quantity, result.Quantity);
        Assert.Equal(input.ImageLink, result.ImageLink);
    }
}
Üçüncü yazacağımız test ürün silme testi olacak. BaseIntegrationTest sınıfından türeyen DeleteProductTests adında bir sınıf oluşturuyoruz. İlk önce veritabanımıza bir ürün ekliyoruz. Daha sonra gerekli input objemizi oluşturup istek servise atıyoruz. İstek tamamlandıktan sonra tekrardan DbContext üzerinden veritabanından ürünü sorguluyoruz ve sonucun null gelmesini bekliyoruz.
using Application.Products.Delete;
using Domain;
using Microsoft.EntityFrameworkCore;

namespace Application.IntegrationTests.Products;

public sealed class DeleteProductTests(IntegrationTestWebAppFactory factory): BaseIntegrationTest(factory)
{
    [Fact]
    public async Task Should_Delete_Product()
    {
        var product = Product.Create(
            name: "IPhone 15 Pro",
            description: "IPhone telefon",
            imageLink: "https://s3.superproducts.com/iphone-15-pro.png",
            price: 100_000,
            quantity: 100);

        await DbContext.Set<Product>().AddAsync(product);
        await DbContext.SaveChangesAsync();

        var input = new DeleteProductInput
        {
            Id = product.Id
        };

        await deleteProductService.Handle(input);

        var deletedProduct = await DbContext.Set<Product>().FirstOrDefaultAsync(p => p.Id == input.Id);
        Assert.Null(deletedProduct);
    }
}
Dördüncü yazacağımız test id ye göre ürün getirme testi olacak. BaseIntegrationTest sınıfından türeyen GetProductByIdTests adında bir sınıf oluşturuyoruz. İlk önce veritabanımıza bir ürün ekliyoruz. Daha sonra gerekli input objemizi oluşturup servise istek atıyoruz. İsteğin sonucunda dönen ürünün null olmadığını ve ürünün id değerinin istek atarken gönderdiğimiz id ile karşılatırıyoruz.
using Application.Products.GetItem;
using Domain;

namespace Application.IntegrationTests.Products;

public sealed class GetProductByIdTests(IntegrationTestWebAppFactory factory): BaseIntegrationTest(factory)
{
    [Fact]
    public async Task Should_Get_Product()
    {
        var product = Product.Create(
            name: "IPhone 15 Pro",
            description: "IPhone telefon",
            imageLink: "https://s3.superproducts.com/iphone-15-pro.png",
            price: 100_000,
            quantity: 100);

        await DbContext.Set<Product>().AddAsync(product);
        await DbContext.SaveChangesAsync();

        var result = await getProductItemService.Handle(new GetProductItemInput
        {
            Id = product.Id
        });

        Assert.NotNull(product);
        Assert.IsType<Product>(product);
        Assert.Equal(product.Id, result.Id);
    }
}
Beşinci ve son yazacağımız test ise ürün listesini getirme olacaktır. BaseIntegrationTest sınıfından türeyen GetProductListTests adında bir sınıf oluşturuyoruz. İlk önce veritabanımıza üç adet ürün ekliyoruz. Daha sonra gerekli input objemizi oluşturup servise istek atıyoruz. İsteğin sonucunda dönen ürün listesinin null olmaması gerektiğini ve liste içerisinde üç adet ürünün olması gerektiğini kontrol ediyoruz.
using Domain;

namespace Application.IntegrationTests.Products;

public sealed class GetProductListTests(IntegrationTestWebAppFactory factory): BaseIntegrationTest(factory)
{
    [Fact]
    public async Task Should_Get_Product_List()
    {
        await DbContext.Set<Product>().AddRangeAsync(
            [
                Product.Create(
                    name: "IPhone 15",
                    description: "IPhone telefon",
                    imageLink: "https://s3.superproducts.com/iphone-15.png",
                    price: 80_000,
                    quantity: 100),
                Product.Create(
                    name: "IPhone 15 Plus",
                    description: "IPhone telefon",
                    imageLink: "https://s3.superproducts.com/iphone-15-plus.png",
                    price: 90_000,
                    quantity: 100),
                Product.Create(
                    name: "IPhone 15 Pro",
                    description: "IPhone telefon",
                    imageLink: "https://s3.superproducts.com/iphone-15-pro.png",
                    price: 100_000,
                    quantity: 100)
            ]
        );
        await DbContext.SaveChangesAsync();

        var products = await getProductListService.Handle();
        Assert.NotNull(products);
        Assert.IsType<List<Product>>(products);
        Assert.Equal(3, products.Count);
    }
}
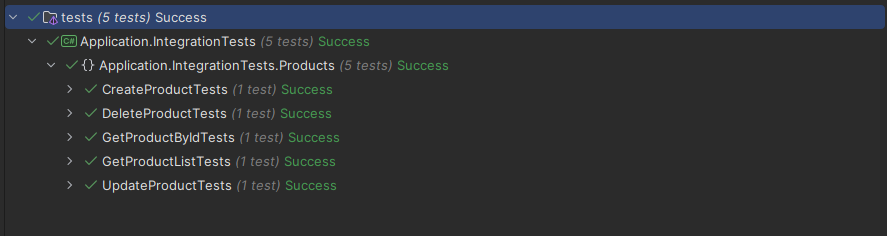
Testlerimizi yazdıktan sonra çalıştıralım. Testlerimizin hepsi aşağıdaki görseldeki gibi başarılı bir şekilde tamamlanacaktır.
Peki şimdi biz ne yaptık?
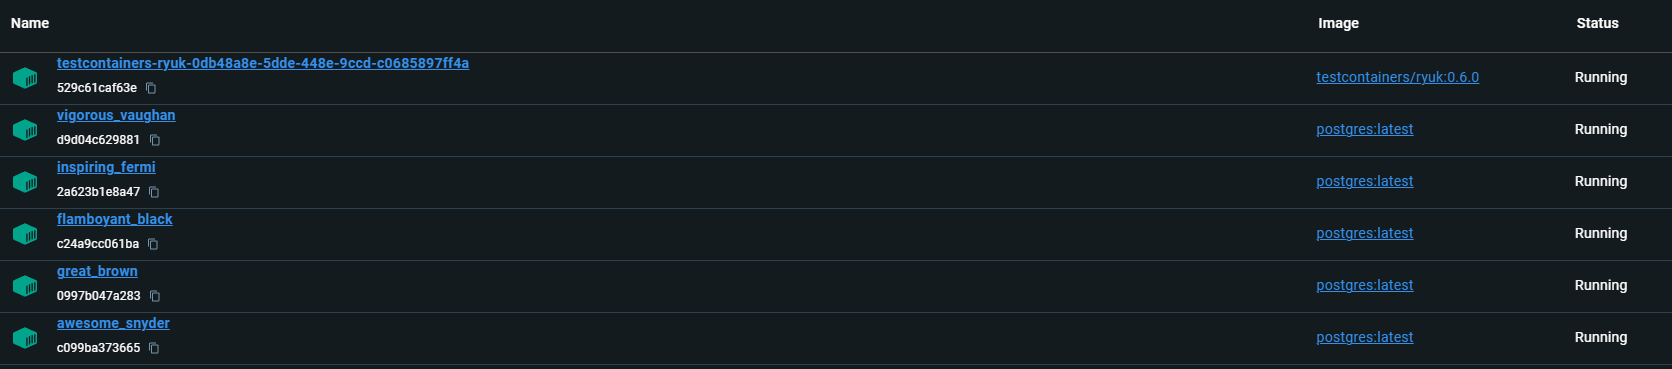
Biz bu test altyapısı ile her test senaryosu için bir postgres veritabanı ayağa kaldırdık. Bunu yapabilmek için docker ve testcontainers kullandık. Testcontainers tüm süreci kendisi yönetti. Aşağıdaki görselde de bunu görebilirsiniz. Bir adet testcontainer kendisi için container ve her test senaryosu için bir postgres docker container'ı ayağa kaldırıldı. Testler tamamlandıkça containerlar öldürüldü ve ortadan kaldırıldı. Tüm testler tamamlandıktan sonra testcontainer için oluşturulan container da öldürüldü ve ortadan kaldırıldı. Biz bu şekilde tüm test senaryolarının birbirinden izole bir şekilde test ortamları kurulabiliriz ve test edilebiliriz.
Bu yazımda testcontainers ile nasıl integration test yazılır konusunu anlatmaya çalıştım. Sizde kendi integration testlerinizi testcontainers kullanarak kolaylıkla gerçekleştirebilirsiniz. Umarım sana dokunmuş olabilirim. Bu örnek projenin kaynak kodunu aşağıya bırakıyorum. Merak ettiğin bir şey olursa benimle iletişime geçebilirsin.
Projenin Son Hali : https://github.com/serhatleventyavas/IntegrationTestAspNetCoreExample