AWS Cdk kullanarak Serverless uygulamamızı nasıl oluştururuz?
AWS CDK (AWS Cloud Development Kit), uygulamalarımızı modellemek için ortak programlama dillerini (typescript, javascript, python, java, go, c#) kullanarak bulut ortamını geliştirme sürecini hızlandırır. AWS CDK ile aws paneli üzerinden yaptğımız her süreci kodlayarak yapabiliriz. EC2 oluşturmak, RDS oluşturmak, VPC oluşturmak, S3 Bucket oluşturmak, Certificate Manager ile bir SSL oluşturmak, Route53 üzerinde bir subdomain eklemek ve tüm aws kaynaklarını birbirleri ile ilişkilendirmek gibi bir çok süreci kodlayarak yapabiliriz.
Bugünkü yazımızda AWS CDK ile serverless uygulama geliştireceğiz. Serverless compute, bir sunucunun sorumluluğunu almadan uygulamalarımızı ya da servislerimizi derlemeyi ve çalıştırmayı sağlayan sistemlerdir. Serverless ile uygun maliyetli, esnek, ölçeklenebilir, her zaman kullanılabilir sistemler tasarlayabiliriz. Tüm bunları yaparken sunucu yönetimi (kurulum, bakım, güvenlik) gibi önemli bir sorumluluğuda AWS bırakırız.
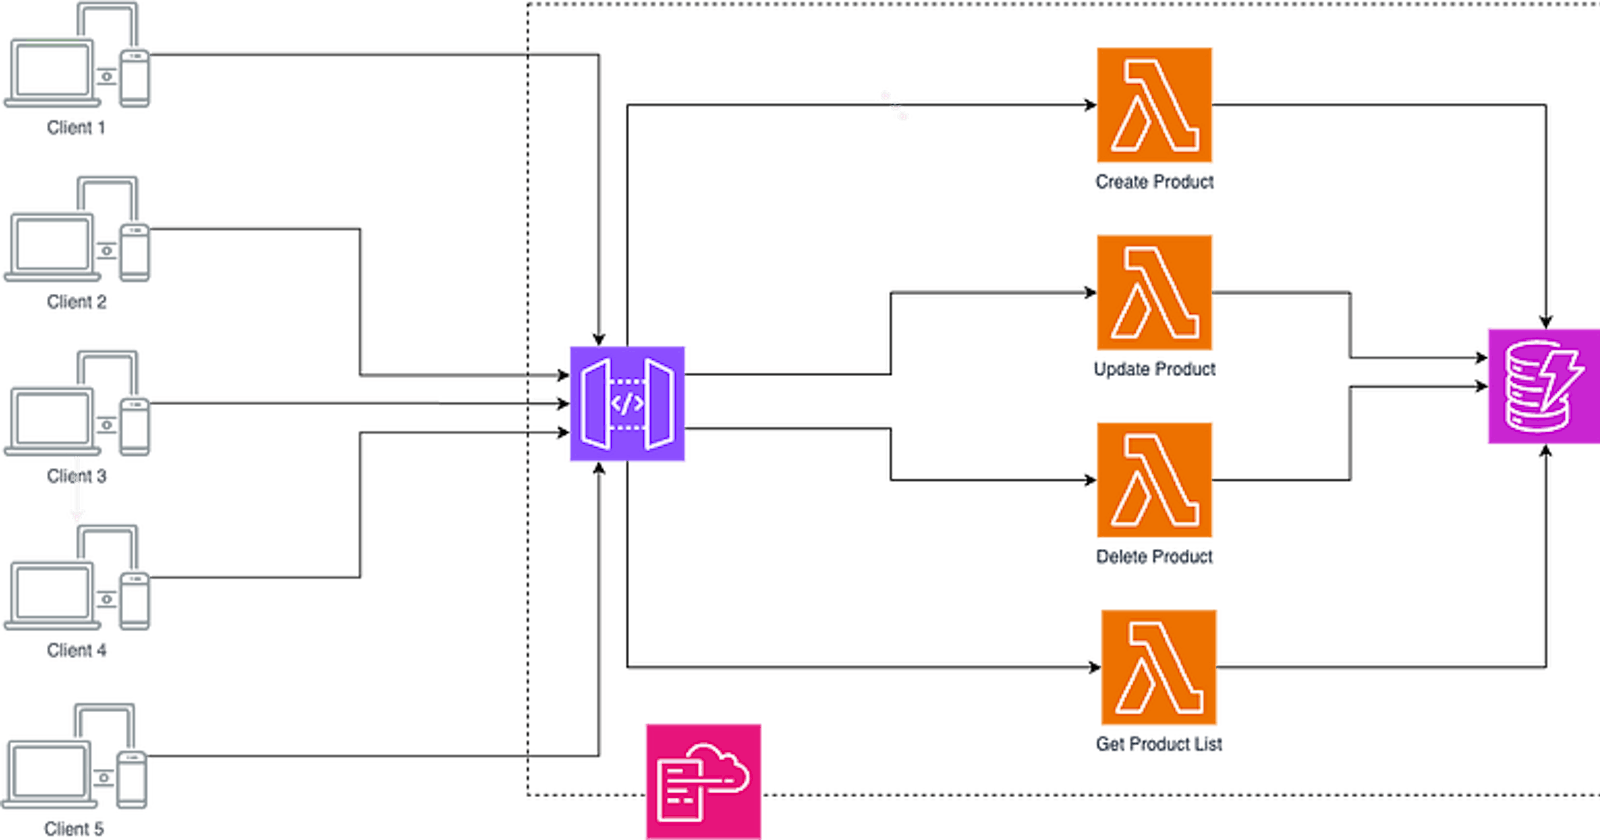
Bu örnek projemizde bir apigateaway servisi oluşturacağız ve bu oluşturduğumuz apigateaway, kullanıcıların isteklerini karşılayacak. Gelen istekleri lambda servislerine yönlendirecek. Lambda servisleri dynamodb üzerinde okuma ya da yazma işlemlerini yapacak ve cevabı geri döndürecek. Tüm bu süreçleri, typescript dili ve aws cdk kütüphanesi ile kodlayarak oluşturacağız. Modellediğimiz bulut altyapısınıda cloudformation ile deploy edeceğiz.
AWS CDK, Serverless ve yapacağımız uygulama hakkında kısaca bahsettik. Şimdi yapacağımız uygulamaya geçelim. Bir AWS Cdk uygulaması oluşturabilmemiz için bilgisayarımızda aws-cdk npm paketi global olarak yüklü olması gerekiyor.
npm install -g aws-cdk
Yukarıdaki kod ile aws-cdk paketini bilgisayarımıza indiriyoruz. Daha sonra mkdir ile yeni bir klasör oluşturuyoruz ve cd ile o klasörün içerisine geçiyoruz. cdk init ile bir aws cdk uygulaması oluşturuyoruz ve projenin dilinin typescript olacağını belirtiyoruz.
mkdir ProductServerlessApplication
cd ProductServerlessApplication
cdk init --language typescript
Bu işlem sonunda cdk uygulamamız oluşmuş oluyor. Uygulamayı vscode ile açtığımızda uygulamanın yapısı aşağıda görebilirsiniz.
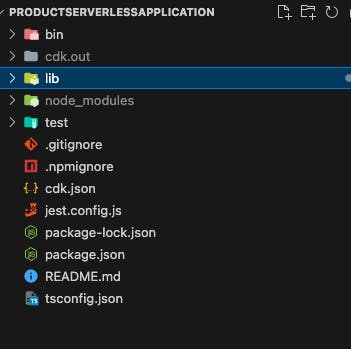
cdk application structure
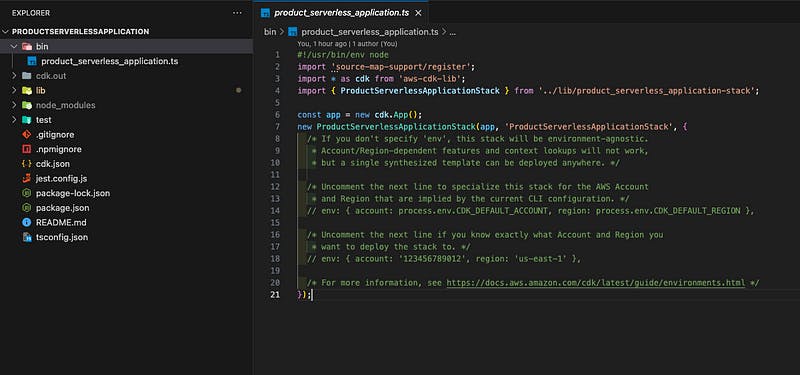
bin klasörü genişlettiğimizde product_serverless_application.ts dosyasını görüyoruz. Bu dosyayı açtığımızda bir cdk.App nesnesi ve bir alt satırda ise ProductServerlessApplicationStack nesnesinin oluşturulduğunu görüyoruz.
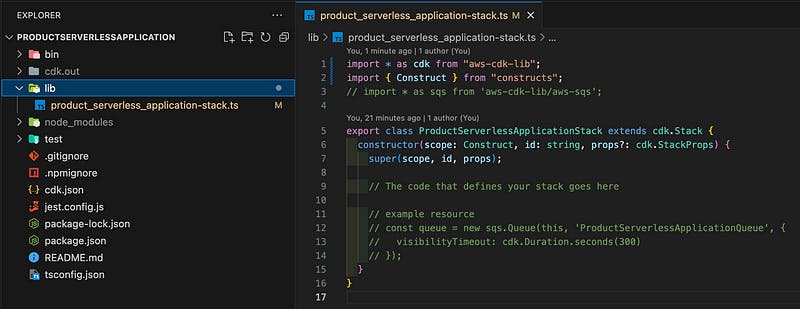
lib klasörünü genişleştiğimizde product_serverless_application-stack.ts adında bir dosya bulacağız. Bu dosyayı açtığımızda cdk.Stack miras alan bir ProductServerlessApplicationStack sınıfı görüyoruz.
Bir cdk uygulamasının yapısı aşağıdaki görseldeki gibidir. Her AWS CDK uygulamasında bir App ve bir ya da birden fazla Stack olabilir. cdk.Stack AWS CloudFormationdaki Stacklere karşılık gelir. Her bir stack deployment birimidir. Stackleri birbirinden bağımsız bir şekilde deploy edebiliriz ancak bir stack kapsamında tanımlanan tüm AWS kaynakların tümü birlikte deploy edilecektir. Construct, aws cdk uygulamasındaki temel yapı taşıdır. Her bir construct, aws’deki bulut bileşinini temsil eder. Bir construct içerisinde bir ya da birden fazla aws kaynakları bulunabilir. Bir stack içerisinde bir ya da birden fazla Construct olabilir.
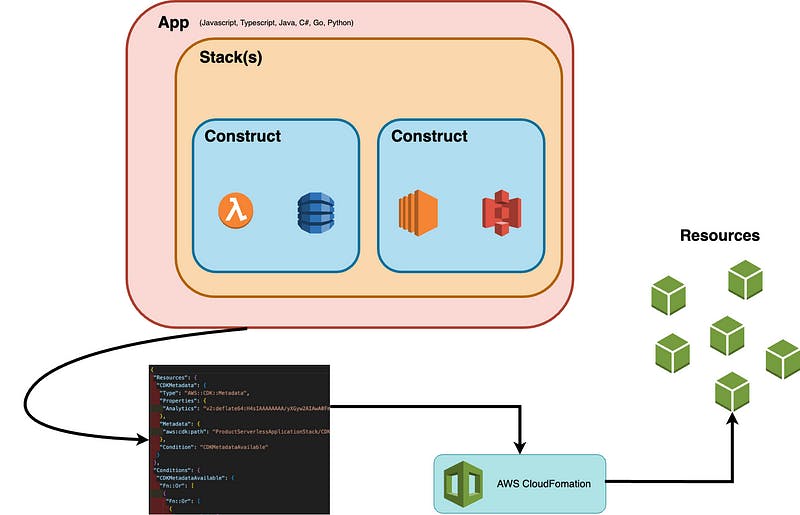
AWS CDK uygulamasındaki temel konseptlerden kısaca bahsettikten sonra örnek uygulamamızda bir app, bir stack ve bir adet construct bulunacak.
lib klasörü içerisine modules adında bir klasör oluşturdum. modules içerisine products adında başka bir klasör oluşturdum. Ayrıca hataları yönetebilmek için modules içerisine api-error.ts dosyasını oluşturdum.
export class ApiError extends Error {
statusCode: number = 0;
message: string = "";
constructor(statusCode: number, message: string) {
super();
this.statusCode = statusCode;
this.message = message;
}
}
products klasörü altına services adında bir klasör oluşturdum. services klasörüne lambda servislerimizi koyacağız. products klasörü içerisine ayrıca product-construct.ts adında dosya oluşturdum. product-construct.ts dosyasını açıp product construct tanımlaması yaptım.
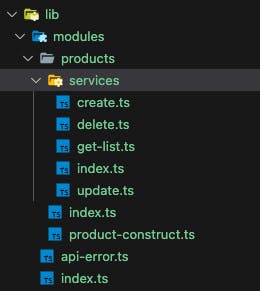
modules directory
import { Construct } from "constructs";
export class ProductConstruct extends Construct {
constructor(scope: Construct, id: string) {
super(scope, id);
}
}
ProductConstruct oluşturduktan sonra ProductServerlessApplicationStack gelip ProductConstruct nesnesini oluşturdum.
import * as cdk from "aws-cdk-lib";
import { Construct } from "constructs";
import { ProductConstruct } from "./modules";
export class ProductServerlessApplicationStack extends cdk.Stack {
constructor(scope: Construct, id: string, props?: cdk.StackProps) {
super(scope, id, props);
new ProductConstruct(this, "Products");
}
}
Bu şekilde bir construct’ı stack ile bağlamış olduk. Şimdi lambda servislerimizi yazalım. İlk yazacağımız servis ürün oluşturmamızı sağlayacak. Her ürünün bir id değeri olacak ve id değerini uuid şeklinde tutacağız. Bu yüzden uuid npm paketini indirmemiz gerekiyor.
npm install uuid
npm install --include\=dev @types/uuid
Yukarıdaki kodlar ile uuid ve uuid types paketlerini indirmiş olduk. Bu örnek uygulamada ürünlerimizi dynamodb üzerinde saklayacağız. Bu yüzden dynamodb client nesnesi oluşturabilmek, put command, update command, scan command sınıflarına erişebilmek için dynamodb npm paketini indirmeliyiz.
npm install @aws-sdk/client-dynamodb
Son olarak lambda sınıflarına, type tanımlamalarına erişebilmek için aws-lambda types npm paketini indirmeliyiz.
npm install --include\=dev @types/aws-lambda
services klasörü içerisine create.ts adında bir dosya oluşturdum. Bir ürün oluşturabilmek için ürünün başlık, açıklama ve ücret parametreleri alıyoruz.
// create.ts
import { APIGatewayEvent, APIGatewayProxyResult, Context } from "aws-lambda";
import {
AttributeValue,
DynamoDBClient,
PutItemCommand,
} from "@aws-sdk/client-dynamodb";
import { v4 as uuidv4 } from "uuid";
import { ApiError } from "../../api-error";
export const handler = async (
event: APIGatewayEvent,
context: Context
): Promise => {
try {
const requestBodyJSON = JSON.parse(event.body ?? "{}");
const title = (requestBodyJSON["title"] ?? "") as string;
const description = (requestBodyJSON["description"] ?? "") as string;
const price = (requestBodyJSON["price"] ?? "") as string;
if (title.length === 0) {
throw new ApiError(400, "Title is required");
}
if (description.length === 0) {
throw new ApiError(400, "Description is required");
}
if (price.length === 0) {
throw new ApiError(400, "Price is required");
}
if (isNaN(Number(price))) {
throw new ApiError(400, "Price is not valid");
}
const productId = uuidv4();
const client = new DynamoDBClient({});
const newRecord: Record = {
id: {
S: productId,
},
title: {
S: title,
},
description: {
S: description,
},
price: {
N: parseFloat(price).toFixed(2),
},
is_deleted: {
BOOL: false,
},
created_date: {
S: new Date().toUTCString(),
},
};
const command = new PutItemCommand({
TableName: "products",
Item: newRecord,
});
await client.send(command);
return {
statusCode: 201,
body: JSON.stringify({
data: {
title: title,
description: description,
price: price,
id: productId,
},
}),
};
} catch (error) {
if (error instanceof ApiError) {
return {
statusCode: error.statusCode,
body: JSON.stringify({
message: error.message,
}),
};
}
return {
statusCode: 500,
body: JSON.stringify({
message: "Unknown Error",
}),
};
}
};
Burada kullanıcıdan gelen başlık, açıklama ve ücret parametrelerini basit bir kaç kontrolden geçirdikten sonra dynamodb’ye yeni bir kayıt eklemek için PutItemCommand sınıfını kullanıyoruz ve oluşturulan nesneyi send methoduna parametre olarak vererek yeni bir ürün oluşturuyoruz.
Sırada bir ürünü güncellemek için kullanacağımız fonksiyonu yazalım. Bunun için services klasörü altında update.ts adında bir dosya oluşturuyoruz.
//update.ts
import { APIGatewayEvent, APIGatewayProxyResult, Context } from "aws-lambda";
import {
AttributeValue,
DynamoDBClient,
UpdateItemCommand,
} from "@aws-sdk/client-dynamodb";
import { validate as uuidValidate } from "uuid";
import { ApiError } from "../../api-error";
export const handler = async (
event: APIGatewayEvent,
context: Context
): Promise => {
try {
const pathParameters = event.pathParameters ?? {};
const productId = pathParameters["id"] ?? "";
const requestBodyJSON = JSON.parse(event.body ?? "{}");
const title = (requestBodyJSON["title"] ?? "") as string;
const description = (requestBodyJSON["description"] ?? "") as string;
const price = (requestBodyJSON["price"] ?? "") as string;
if (productId.length === 0) {
throw new ApiError(400, "Product Id is required");
}
if (!uuidValidate(productId)) {
throw new ApiError(400, "Product Id is not valid");
}
if (title.length === 0) {
throw new ApiError(400, "Title is required");
}
if (description.length === 0) {
throw new ApiError(400, "Description is required");
}
if (price.length === 0) {
throw new ApiError(400, "Price is required");
}
if (isNaN(Number(price))) {
throw new ApiError(400, "Price is not valid");
}
const client = new DynamoDBClient({});
const command = new UpdateItemCommand({
TableName: "products",
Key: {
id: {
S: productId,
},
},
UpdateExpression:
"set title = :title, description = :description, price = :price",
ConditionExpression: "id = :id and is_deleted = :is_deleted",
ExpressionAttributeValues: {
":title": { S: title },
":description": { S: description },
":price": { N: parseFloat(price).toFixed(2) },
":id": { S: productId },
":is_deleted": { BOOL: false },
},
ReturnValues: "ALL_NEW",
});
await client.send(command);
return {
statusCode: 200,
body: JSON.stringify({
data: {
title: title,
description: description,
price: price,
id: productId,
},
}),
};
} catch (error) {
if (error instanceof ApiError) {
return {
statusCode: error.statusCode,
body: JSON.stringify({
message: error.message,
}),
};
}
return {
statusCode: 500,
body: JSON.stringify({
message: "Unknown Error",
}),
};
}
};
Ürünü güncellemek için ürün id, başlık, açıklama, ücret parametrelerini kullanıcıdan alıyoruz. Bunları kontrollerden geçirdikten sonra ürünü güncellemek için UpdateItemCommand sınıfını kullanarak bir nesne oluşturuyoruz. Daha sonra send methodu ile ürün verisini güncelliyoruz.
Sıradaki servisimiz ürün silme fonksiyonu. services klasörü içerisine delete.ts dosyasını oluşturuyoruz.
//delete.ts
import { APIGatewayEvent, APIGatewayProxyResult, Context } from "aws-lambda";
import { validate as uuidValidate } from "uuid";
import { ApiError } from "../../api-error";
import { DynamoDBClient, UpdateItemCommand } from "@aws-sdk/client-dynamodb";
export const handler = async (
event: APIGatewayEvent,
context: Context
): Promise => {
try {
const pathParameters = event.pathParameters ?? {};
const productId = pathParameters["id"] ?? "";
if (productId.length === 0) {
throw new ApiError(400, "Product Id is required");
}
if (!uuidValidate(productId)) {
throw new ApiError(400, "Product Id is not valid");
}
const client = new DynamoDBClient({});
const command = new UpdateItemCommand({
TableName: "products",
Key: {
id: {
S: productId,
},
},
UpdateExpression: "set is_deleted = :is_deleted",
ConditionExpression: "id = :id and is_deleted = :current_is_deleted",
ExpressionAttributeValues: {
":id": { S: productId },
":current_is_deleted": { BOOL: false },
":is_deleted": { BOOL: true },
},
ReturnValues: "ALL_NEW",
});
await client.send(command);
return {
statusCode: 200,
body: JSON.stringify({
message: "Product is deleted",
}),
};
} catch (error) {
if (error instanceof ApiError) {
return {
statusCode: error.statusCode,
body: JSON.stringify({
message: error.message,
}),
};
}
return {
statusCode: 500,
body: JSON.stringify({
message: "Unknown Error",
}),
};
}
};
Ürün silme fonksiyonu, ürün güncelleme fonksiyonu ile mantık olarak aynı. Bu örnekte ürünü veritabanından tamamen silmek yerine is_deleted değerini true yaparak silinmiş olarak işaretliyoruz.
Son olarak ürünleri getirecek olan fonksiyonumuzu yazalım. Bunun için services klasörü altına get-list.ts dosyasını açalım.
// get-list.ts
import { DynamoDBClient, ScanCommand } from "@aws-sdk/client-dynamodb";
import { APIGatewayEvent, APIGatewayProxyResult, Context } from "aws-lambda";
import { ApiError } from "../../api-error";
export interface ProductDto {
id: string;
title: string;
description: string;
price: number;
}
export const handler = async (
event: APIGatewayEvent,
context: Context
): Promise => {
try {
const client = new DynamoDBClient({});
const command = new ScanCommand({
FilterExpression: "is_deleted = :is_deleted",
ExpressionAttributeValues: {
":is_deleted": { BOOL: false },
},
TableName: "products",
});
const response = await client.send(command);
const productList: ProductDto[] = (response.Items ?? []).map((p) => {
return {
id: p["id"].S ?? "",
title: p["title"].S ?? "",
description: p["description"].S ?? "",
price: parseFloat(p["price"].N ?? "0.0"),
};
});
return {
statusCode: 200,
body: JSON.stringify({
data: productList,
}),
};
} catch (error) {
if (error instanceof ApiError) {
return {
statusCode: error.statusCode,
body: JSON.stringify({
message: error.message,
}),
};
}
return {
statusCode: 500,
body: JSON.stringify({
message: "Unknown Error",
}),
};
}
};
ScanCommand sınıfını dynamodb’den verileri çekmek için kullanırız. Burada is_deleted=false olan ürünleri istediğimiz için filtreme yaptık ve send methodu ile ürünleri dynamodb’den aldık. Temel crud işlemlerini yapan fonksiyonları yazdığımıza göre artık bunları lambda olarak tanımla işlemini geçebiliriz. Bunun için ProductConstruct içerisine geri dönüyoruz.
import { Construct } from "constructs";
import { NodejsFunction } from "aws-cdk-lib/aws-lambda-nodejs";
import { Runtime } from "aws-cdk-lib/aws-lambda";
import { join } from "path";
import { Duration } from "aws-cdk-lib";
import * as apigateway from "aws-cdk-lib/aws-apigateway";
import { AttributeType, Table } from "aws-cdk-lib/aws-dynamodb";
import * as cdk from "aws-cdk-lib";
export class ProductConstruct extends Construct {
constructor(scope: Construct, id: string) {
super(scope, id);
const restApiId = "ProductApi";
const dynamoProductTableName = "products";
const dynamoProductTable = new Table(this, dynamoProductTableName, {
partitionKey: {
name: "id",
type: AttributeType.STRING,
},
tableName: dynamoProductTableName,
removalPolicy: cdk.RemovalPolicy.RETAIN,
});
const productApiGateaway = new apigateway.RestApi(this, restApiId, {
restApiName: "Product Api",
description: "Product Rest Api",
deploy: true,
deployOptions: {
stageName: "prod",
tracingEnabled: true,
},
endpointTypes: [apigateway.EndpointType.EDGE],
});
const createProductFunction = new NodejsFunction(this, "CreateProduct", {
runtime: Runtime.NODEJS_18_X,
entry: join(__dirname, "services", "create.ts"),
timeout: Duration.minutes(1),
memorySize: 512,
});
const putProductFunction = new NodejsFunction(this, "PutProduct", {
runtime: Runtime.NODEJS_18_X,
entry: join(__dirname, "services", "update.ts"),
timeout: Duration.minutes(1),
memorySize: 512,
});
const deleteProductFunction = new NodejsFunction(this, "DeleteProduct", {
runtime: Runtime.NODEJS_18_X,
entry: join(__dirname, "services", "delete.ts"),
timeout: Duration.minutes(1),
memorySize: 512,
});
const getProductListFunction = new NodejsFunction(this, "getProductList", {
runtime: Runtime.NODEJS_18_X,
entry: join(__dirname, "services", "get-list.ts"),
timeout: Duration.minutes(1),
memorySize: 512,
});
dynamoProductTable.grantReadWriteData(createProductFunction);
dynamoProductTable.grantReadData(getProductListFunction);
dynamoProductTable.grantReadWriteData(putProductFunction);
dynamoProductTable.grantReadWriteData(deleteProductFunction);
const getProductListFunctionIntegration = new apigateway.LambdaIntegration(
getProductListFunction
);
const createProductFunctionIntegration = new apigateway.LambdaIntegration(
createProductFunction
);
const putProductFunctionIntegration = new apigateway.LambdaIntegration(
putProductFunction
);
const deleteProductFunctionIntegration = new apigateway.LambdaIntegration(
deleteProductFunction
);
const productResource = productApiGateaway.root.addResource("products", {});
const productResourceWithId = productResource.addResource("{id}");
productResource.addMethod("GET", getProductListFunctionIntegration);
productResource.addMethod("POST", createProductFunctionIntegration);
productResourceWithId.addMethod("PUT", putProductFunctionIntegration);
productResourceWithId.addMethod("DELETE", deleteProductFunctionIntegration);
}
}
İlk önce bir dynamodb tablosuna ihtiyacımız olduğu için construct içerisinde tablo oluşturduk. partitionKey basit bir primary key’dir. Bu gerekli bir parametredir. ismini ve tipini belirttim. tableName tablonun adıdır. RemovalPolicy dynamodb tablosunun CloudFormation tarafından yönetilmesinin durdurulması durumunda tablonun durumunun ne olacağını kontrol eder. 3 farklı durum vardır:
- Destroy: Tabloyu yok et.
- Retain: Tabloyu tutmaya devam et.
- Snapshot: Tabloyu yok et, ancak yok etmeden önce bir kopyasını al ve onu sakla.
Bir çok kaynakta Retain default seçenektir.
const dynamoProductTableName = "products";
const dynamoProductTable = new Table(this, dynamoProductTableName, {
partitionKey: {
name: "id",
type: AttributeType.STRING,
},
tableName: dynamoProductTableName,
removalPolicy: cdk.RemovalPolicy.RETAIN,
});
Daha sonra bir apigateaway kaynağına ihtiyacımız var. Kullanıcıyı bir ürün oluşturmak, güncellemek, silmek ya da ürünleri getirmek istediğinde apigateaway ile karşılayacağız. apigateaway ile bir RestApi oluşturduk ve deploy değerini true yaptık. Bu şekilde rest api direk dış dünyaya açmış olduk. deployOptions ile stageName ve tracingEnabled değerlerimizi verdik. tracingEnabled değerine true vererek Amazon X-Ray izlemeyi aktifleştirdik. endpointTypes değerine ise apigateway.EndpointType.EDGE değerini verdik. Bu restApi’lar için varsayılan bir değerdir. EDGE dışında REGIONAL ve PRIVATE değerler vardır.
const restApiId = "ProductApi";
const productApiGateaway = new apigateway.RestApi(this, restApiId, {
restApiName: "Product Api",
description: "Product Rest Api",
deploy: true,
deployOptions: {
stageName: "prod",
tracingEnabled: true,
},
endpointTypes: [apigateway.EndpointType.EDGE],
});
Daha sonra NodeJs lambda fonksiyonlarını tanımladık. lambda fonksiyonlarımın çalışacağı runtime versiyonunu nodejs18 seçtik. timeout olarak 1 dakika verdik. lambda fonksiyonun kullanacağı memorySize değerini 512mb olarak belirledik. Son olarak entrye değer olarak lambda fonksiyonun çalıştıracağı handler fonksiyonlarını verdik.
const createProductFunction = new NodejsFunction(this, "CreateProduct", {
runtime: Runtime.NODEJS_18_X,
entry: join(__dirname, "services", "create.ts"),
timeout: Duration.minutes(1),
memorySize: 512,
});
const putProductFunction = new NodejsFunction(this, "PutProduct", {
runtime: Runtime.NODEJS_18_X,
entry: join(__dirname, "services", "update.ts"),
timeout: Duration.minutes(1),
memorySize: 512,
});
const deleteProductFunction = new NodejsFunction(this, "DeleteProduct", {
runtime: Runtime.NODEJS_18_X,
entry: join(__dirname, "services", "delete.ts"),
timeout: Duration.minutes(1),
memorySize: 512,
});
const getProductListFunction = new NodejsFunction(this, "getProductList", {
runtime: Runtime.NODEJS_18_X,
entry: join(__dirname, "services", "get-list.ts"),
timeout: Duration.minutes(1),
memorySize: 512,
});
Bu lambda fonksiyonların dynamodb ile etkileşime geçebilmesi için gerekli izinleri lambda servislerine vermemiz gerekiyor. Create, update, delete servislerine okuma(read) ve yazma(write) izinlerini, get list servisine ise sadece okuma (read) iznini verdik.
dynamoProductTable.grantReadWriteData(createProductFunction);
dynamoProductTable.grantReadData(getProductListFunction);
dynamoProductTable.grantReadWriteData(putProductFunction);
dynamoProductTable.grantReadWriteData(deleteProductFunction);
Oluşturduğumuz apigateaway ile lambda fonksiyonları entegre etmemiz gerekiyor.
const getProductListFunctionIntegration = new apigateway.LambdaIntegration(
getProductListFunction
);
const createProductFunctionIntegration = new apigateway.LambdaIntegration(
createProductFunction
);
const putProductFunctionIntegration = new apigateway.LambdaIntegration(
putProductFunction
);
const deleteProductFunctionIntegration = new apigateway.LambdaIntegration(
deleteProductFunction
);
Lambda fonksiyonlarını apigateaway ile entegre ettikten sonra ise api kaynakları, methodları tanımlamamız gerekiyor. Bu şekilde apigateaway ile müşterimizinden istekleri alıp, gerekli lambda fonksiyonlarını çalıştırabileceğiz. Lambda fonksiyonlarımız dynamodb ile beraber ürün ekleyebilecek, güncelleyebilecek, silebilecek ve tüm ürünleri listeleyebilecek.
const productResource = productApiGateaway.root.addResource("products", {});
const productResourceWithId = productResource.addResource("{id}");
productResource.addMethod("GET", getProductListFunctionIntegration);
productResource.addMethod("POST", createProductFunctionIntegration);
productResourceWithId.addMethod("PUT", putProductFunctionIntegration);
productResourceWithId.addMethod("DELETE", deleteProductFunctionIntegration);
Sıradaki adım uygulamamızı cloudformation ile birlikte tüm kaynakları oluşturmak ve çalışabilir hale getirmek olacaktır. Bunu yapmak için önce uygulamamızın cloudformation tarafından anlaşılıp, çalıştırabilmesi için bir şablon oluşturmamız gerekiyor. Aşağıda görmekte olduğunuz kod parçası uygulamamızı çalıştırır ve uygulamamızdaki bulunan tüm kaynakları içeren bir cloudformation şablonuna çevirir. Oluşturulan şablon dosyası cdk.out klasörü içerisinde bulunur. Yine yazmış olduğumuz crud fonksiyonlarını da burada esbuild tarafından javascripte dönüşmüş hallerini bulabilirsiniz.
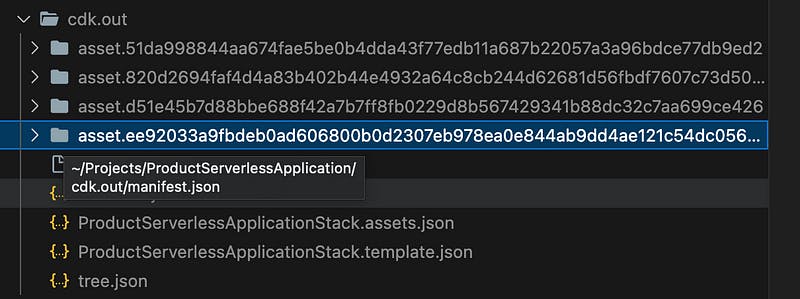
cdk synth
Dosya format türü yaml’dır. cdk synth komutu çalıştığında esbuild ile nodejs lambda fonksiyonlarımızı javascript koduna dönüştürmek için dockera ihtiyaç duyacaktır. Eğer docker makinenizde yoksa ya da çalışmıyorsa aşağıdaki gibi bir hata alabilirsiniz.

docker error
Cloudformation şablonunu oluşturduktan sonra bunu deploy edebiliriz. Deploy edebilmemiz için cdk deploy komutunu kullanabiliriz. Bu işlemi yapabilmemiz için bir aws hesabına ihtiyacımız olacaktır. aws hesabınıza giriş yaptıktan sonra IAM Identity Center panelinden kullanıcılar ekranına gelip bir kullanıcı oluşturacağız.
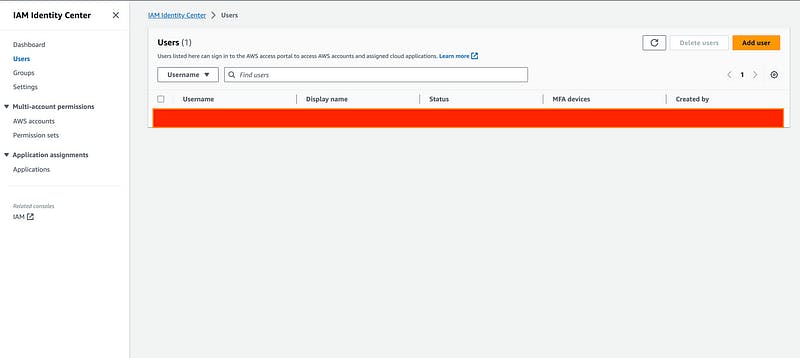
Add user butonuna tıklayalım.
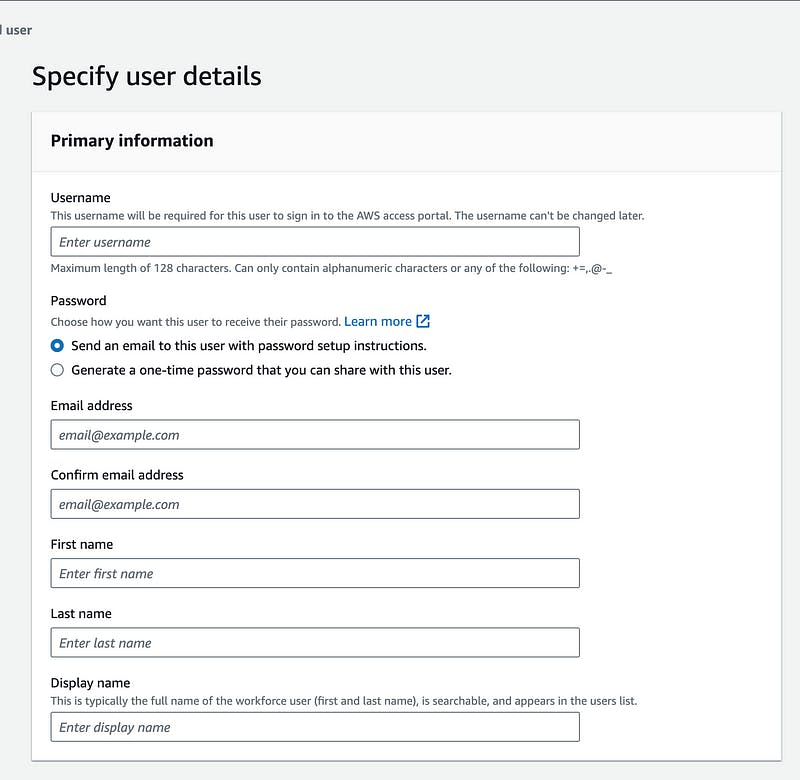
Gerekli bilgileri girdikten sonra oluşturduğumuzun kullanıcının email adresine kurulum bilgilerini içeren bir email alacaktır. Bu email üzerinden şifresini oluşturabilecek ve aws paneline erişim sağlayabilecek.
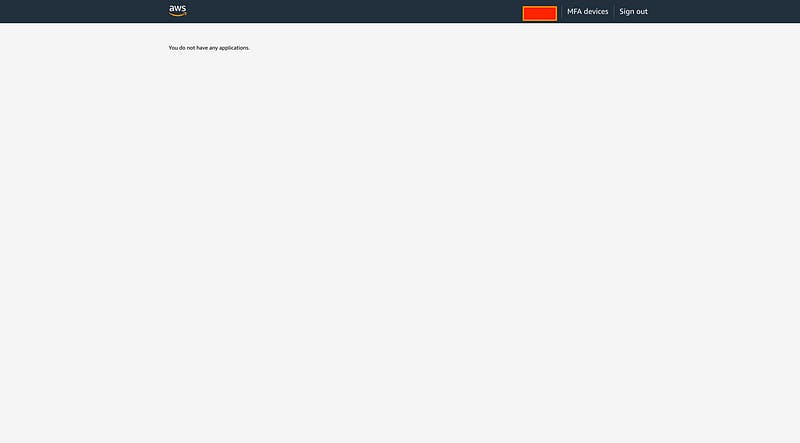
Bu işlemleri yaptıktan sonra kullacımızın paneli yukarıdaki ekran alıntısındaki gibi gözükecektir. AWS kaynaklarına erişim sağlayabilmesi için AWS account’u ile kullanıcıyı eşleştirmemiz gerekiyor.
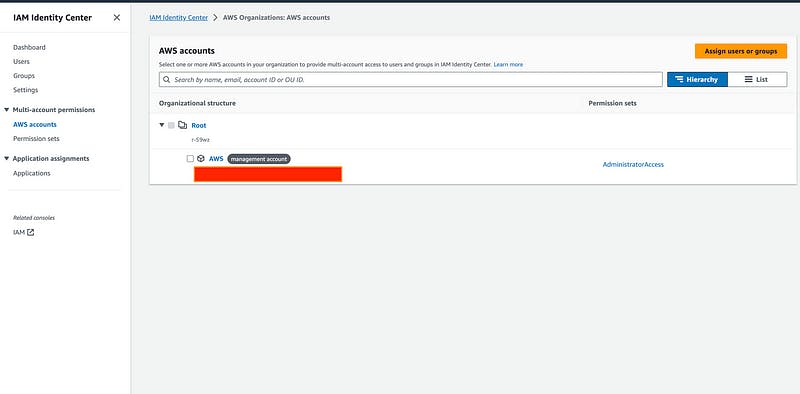
AWS Accounts
Aws accounts sekmesine geliyoruz ve root altındaki AWS tıklıyoruz.
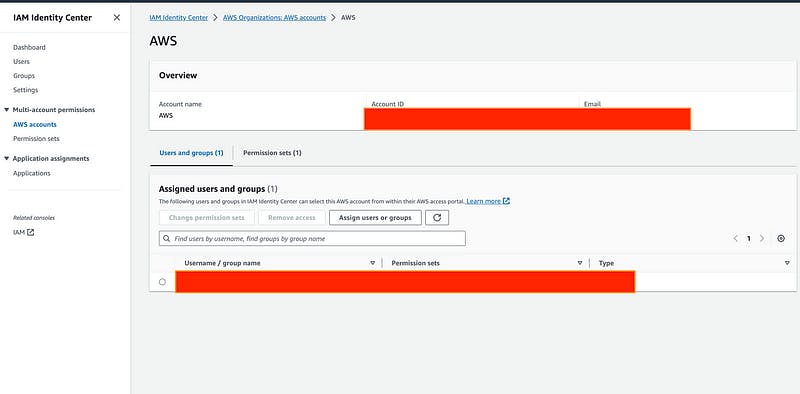
AWS Account Detail
Assign users or groups butonuna tıkladıktan sonra açılan ekranda oluşturduğumuz kullanıcıyı ve izin kümesini seçip süreci tamamlıyoruz. Eğer sistemde bir izin kümesi yoksa onu da permission sets sekmesinden oluşturabilirsiniz. Bu işlemi yaptıktan sonra kullanıcınız verilen izinler doğrultusunda kaynaklara erişim sağlayabilecektir.

Bu işlemlerden sonra konsol üzerinden aws configure sso komutunu çağırarak kullanıcımızın profil bilgisini bilgisayarımız üzerinde oluşturmalıyız. Bizden birkaç bilgi istedikten sonra profilimiz başarılı bir şekilde oluşturmuş olduk.
aws configure sso
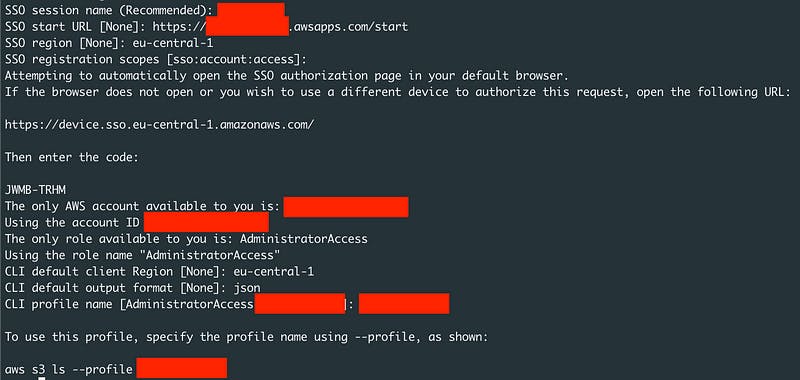
Son olarak profilimiz ile deployment sürecini başlatmalıyız. Bunun için aws deploy —profile [profile name] komutunu çalıştırmalıyız.
aws deploy --profile [profile name]
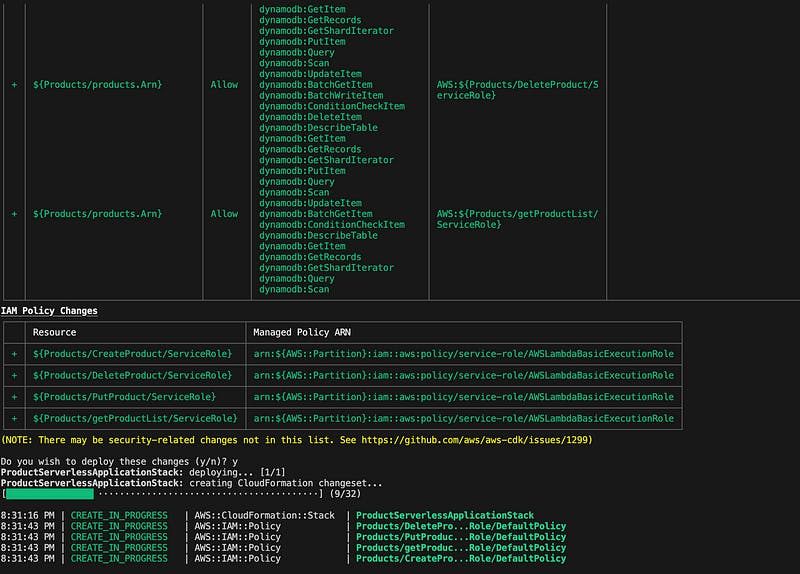
deployment process

deploymen result
Deployment işlemi bittikten sonra bize api endpoint url bilgisini döndürdüğünü görebiliriz. Panelden cloudformation ekranına geldiğimizde yeni bir stack oluştuğunu görebiliriz.

cloudformation
dynamodb tables ekranına geldiğimizde products isminde yeni bir dynamodb tablosu oluşturulduğunu görebiliriz.

dynamodb tables
apigateaway ekranına geldiğimizde yeni bir rest api oluşturulduğunu görebiliriz.

api gateaway
lambda ekranına geldiğimizde de lambda fonskiyonlarını görebiliriz.

lambda functions
Herşey doğru bir şekilde oluşturulduğunu gördüğümüze göre beraber doğru bir şekilde çalıştıklarını test edelim.
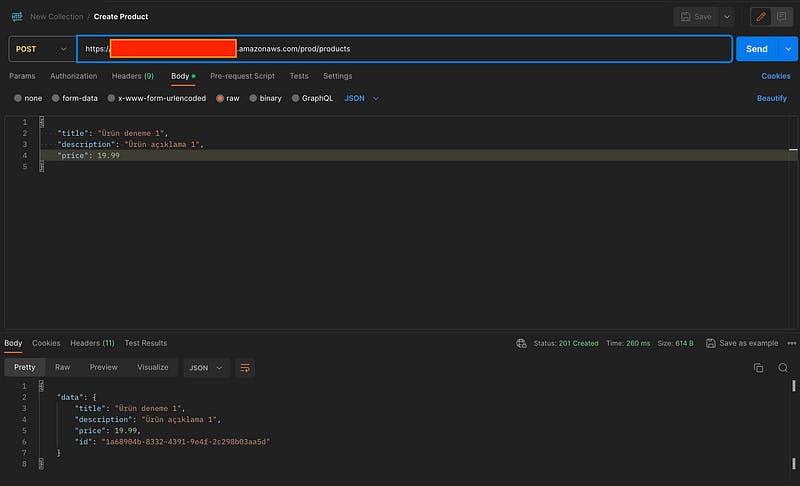
create product
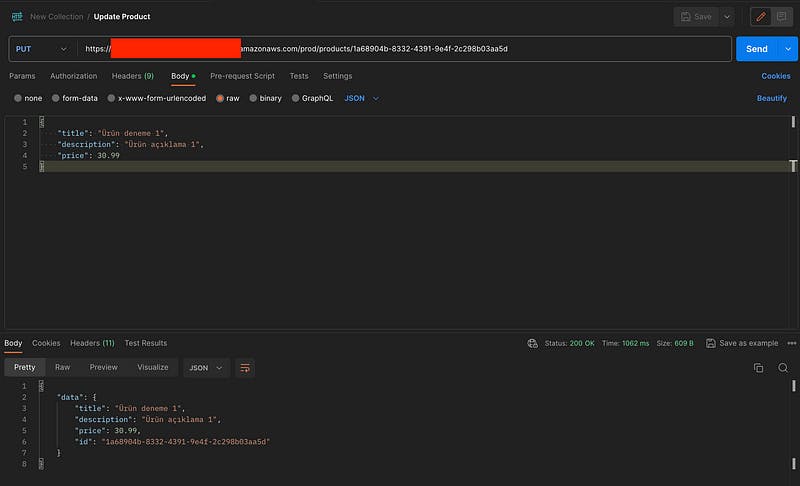
update product
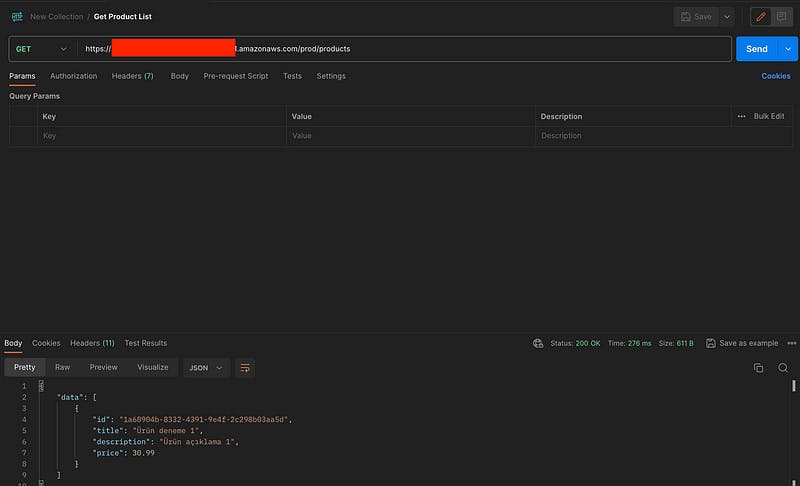
get product list
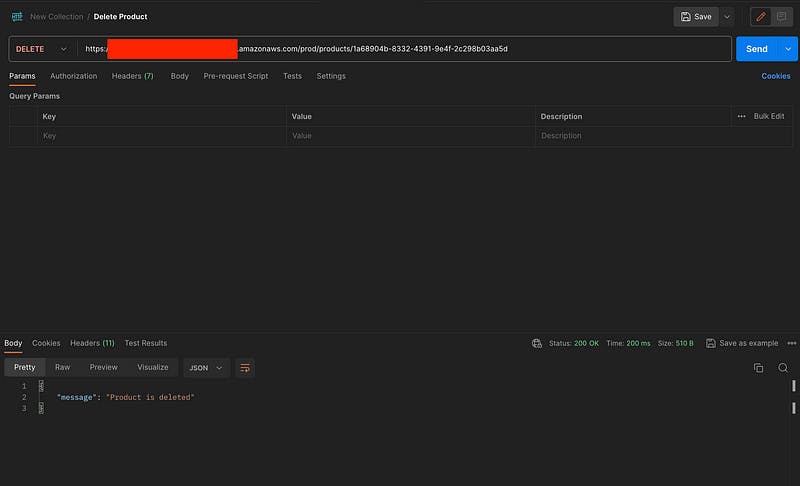
delete product
postman üzerinden yaptığımız testlerde rest api servislerimiz doğru şekilde çalıştığını görüyoruz. Eğer oluşturduğunuz stackleri yok etmek istiyorsanız cdk destroy — profile [profile name] komutunu çalıştırarak yok edebilirsiniz.
cdk destroy --profile [profile name]
Bu yazımızda aws cdk ile lambda fonksiyonları, dynamodb ve apigateaway birbirleri ile entegre şekilde çalıştırabildik. Tüm bu süreci tamamen infrastructure kod ile yaptık. Sizde istediğiniz aws kaynaklarını aws cdk ile oluşturabilirsiniz. Umarım sana dokunmuş olabilirim. Bu örnek projenin kaynak kodunu aşağıya bırakıyorum. Merak ettiğin bir şey olursa benimle iletişime geçebilirsin.
[GitHub - serhatleventyavas/ProductServerlessApplication
Contribute to serhatleventyavas/ProductServerlessApplication development by creating an account on GitHub.github.com](https://github.com/serhatleventyavas/ProductServerlessApplication "https://github.com/serhatleventyavas/ProductServerlessApplication")
